

It’s not a secret that growing in Instagram means taking appealing pictures, but there’s a big difference between the way most people take selfies and how to take photos for Instagram like a pro.
1. Before you even begin… think about “3”
Think about how you want your wall to look like. You can have the best pictures in the world but if you mix lifestyle shots, selfies and studio pictures in the same wall, without separating them in sections, you’ll land up with a messy Instagram wall that doesn’t convert viewers into followers.
Take for example the wall on the left and the wall on the right (all pictures I took), which one are you more attracted to at first glance?
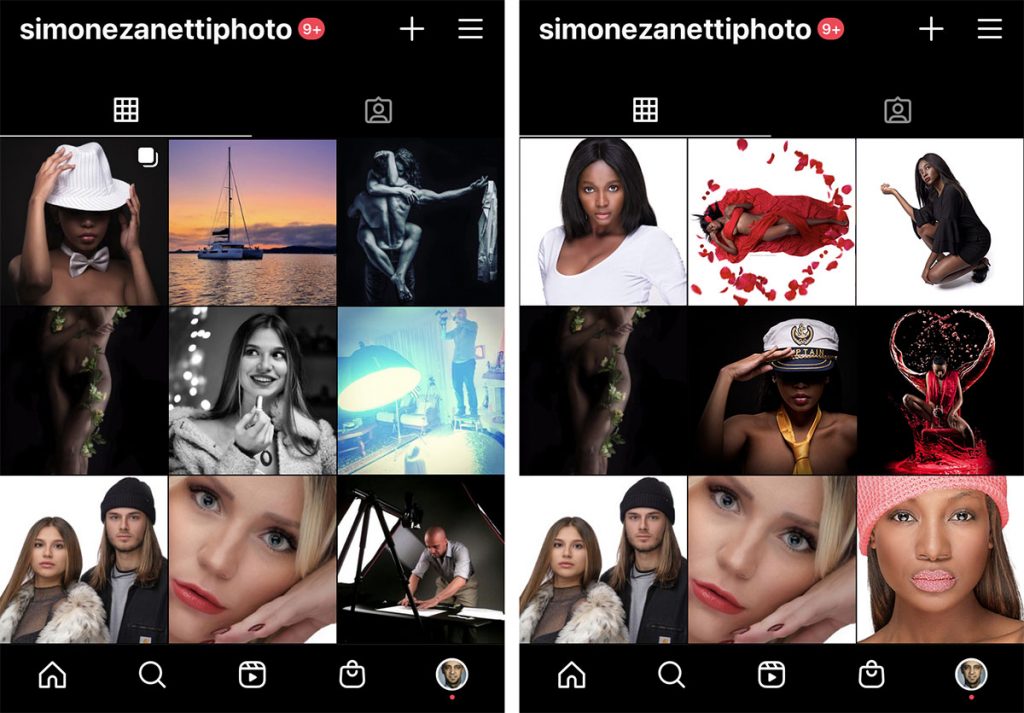
The wall on the left has a mix of different styles, some are studio shots others are environmental portraits, other backstage shots and even some landscape ones. On their own all these shot can be good, but together don’t match.
All I’ve done on the right-hand side is to organise my Instagram wall in rows of 3 of my photos that are uniform either for style, background or colour. In this case, I alternated white background and black background. That’s really all it took.
When you upload on Instagram, think of 3 pictures that will go well together, and never break this rule. In few days your wall will look more professional and the number of followers will pick up velocity.
How to take photos for Instagram like a photographer would do?
I’m a businessman by trade but I’ve been as a professional photographer as a hobby since I was a teenager. How can anyone be a “professional” photographer if photography is just a hobby? Simple, it’s a passion because I love photography and film-making but I don’t spend enough time doing it. It’s “professional” because I’ve always been paid a pretty penny for the few times that I shoot for clients.
As a professional photographer, these are my suggestions onhow to take photos for Instagram like a pro.
And yes, you can use your smartphone to take pro photos. Not convinced? Watch this video by @petermckinnon.
2. Composition
If you want to stand out from the crowed Instagram tsunami of pictures, use angles and compositions that everybody else won’t use.
In the example below I’m simply using a 2-step ladder with a model in my home-studio in Italy, but you can achieve the same result by asking a friend to take the shot or simply make a selfie moving your arm around until you see in the preview of your phone an image that is pleasing and unusual.
And no, you don’t need a pro camera nor pro light (see the next point).
When you think how to take photos for Instagram, composition should be your first priority.

3. Light
Light is arguably the most important aspect of a good photo. If you can use indirect, diffused natural ligth. For example you can taka a picture looking at a bright window with a white curtain. It’s important to avoid direct sunlight or you’ll case harsh shadow on your face and, unless you’re Arnold Schwarzenegger, it won’t look pleasant.
No sun? No problem.
Overcast days are the best environment to take pictures that look great and make your skin appear flawless. Plan your shots during cloudy days and play with colours in the foreground and background (more on this later).
If you want to take pictures indoors, make sure the light source (or sources) are BIG. Small led lights will have the same harsh effect of sunlight. If you have a strong but small light, use white, light fabric or white balloons between you and the light.
Another great technique to shoot unique photos is to use a harsh light at the back of the subject and use a big white surface in front of the subject.
In the example below I used a reflector but the same result can be achieved with a white wall or a table cloth.
This technique not only provides an even, smooth light on the subject’s skin, but the harsh light at the back produces a fantastic rim light (the highlights on the hair of the model below). The white surface must be big and close to the subject, otherwise the result will be more like the right image: under exposed.

4. Depth
I’ll be the first one to admit that not all photos require depth, but if you add depth to your photo it will stand out more on Instagram. To do that you just need to have an object in the foreground (close to the phone/camera) and it must be blurred. At the same time the background but be far, well lit and blurred.
Here’s an example: I made the photo below in my studio in South Africa with white paper on the floor and a big soft light from the top, standing on a ladder. Of course, the picture is flat.

And while the photo is technically exposed correctly and the composition pleasant, it can be improved with depth. To make this evident I added some red rose petals on the floor and some others blurred over the main picture, giving the idea that they are close to the camera. Here’s the result:

You see how the picture becomes striking and it’s more likely to be seen and liked on Instagram.
Normally I create depth with composition, but in this case I simply downloaded the petals from a stock image portal.
5. Retouch
Not everybody eats Photoshop for breakfast, but if you’re serious about how to take photos for Instagram you must (must) retouch every single picture you upload.
The 3 edits I apply to all mi pictures are:
- Light fixing (lower highlights, rise shadows, fine-tune the black point)
- White balance
- Dodge & burn
Optional:
- Skin smoothing
- Blemish removal
- Vignetting (in suitable for the shot)
- Teeth whitening (if applicable)
There are thousands of apps to apply all these changes but the one I use the most is free: Snapseed available for iPhone and Android.

You can clearly see above how a nicely composed shot comes up to life after editing it with an app like Snapseed.
Let me know in the comments if you prefer other apps, and if you’re interested in a tutorial for Snapseed.
Bonus tip: collaboration
In the influencers space is well known that collaborating can help all parties involved. So when you are with other Instagram users take a nice shot that will make both if you shine. If the occasion doesn’t exist, create it, ask!

For more info or contact me, click here.


Very useful and unusual tips. Please tell us how use Snapseed and if you use other apps. Thanks
Thanks Maria, I’m planning a video on it.
Thanks.
You’re welcome